Removing a graphics card from a PC is the process of taking out the existing graphics card unit, typically for replacement or maintenance. This involves careful steps to ensure safe removal without causing damage to the card or other PC components. Proper precautions, such as disconnecting power and uninstalling drivers, are essential to prevent complications. Once removed, it creates space for upgrading to a new, more powerful graphics card or for performing maintenance tasks.
Ready to upgrade your PC’s graphics or perform maintenance? Discover the step-by-step guide on how to remove a graphics card from a PC and unlock the door to better gaming and smoother computing. Don’t miss the chance to enhance your PC experience. Let’s get started.
Removing a graphics card from your PC is a fundamental task for upgrading or maintaining your computer. It allows you to replace an outdated card with a newer, more powerful one, or simply conduct maintenance tasks such as cleaning or troubleshooting. This process requires careful steps, such as powering down the PC, uninstalling drivers, and safely extracting the card to avoid any damage to the components.
Selecting a New Graphics Card
Choosing the right replacement graphics card is the next step after safely removing your old one. Consider your budget, the purpose of the upgrade (gaming, content creation, etc.), and compatibility with your motherboard. Research different models and their performance to find the perfect fit for your needs.
Installing the New Graphics Card
Once you’ve selected your new GPU, the installation process is the reverse of what you’ve just completed. Carefully align the card with the PCIe slot and gently but firmly press it in until it clicks securely into place. Reattach the PCIe connector, secure the card with the bracket, and ensure all power connectors are properly connected.
Driver Installation
To make the most of your new Install 3060 Graphics Card, you’ll need to install the latest drivers. Visit the manufacturer’s website and download the appropriate drivers for your operating system. After installation, reboot your PC to ensure the drivers are functioning correctly.
Testing and Optimization
With your new graphics card in place and drivers installed, it’s time to put it to the test. Load up your favorite games or run benchmarking software to check their performance. Adjust in-game settings to match your preferences, and explore any overclocking potential if desired.
By following these steps, you can confidently upgrade your graphics card, enhancing your PC’s capabilities and enjoying a smoother gaming and visual experience. Remember to prioritize safety and maintenance, and you’ll be well on your way to GPU excellence. If you have any questions or need further guidance, don’t hesitate to seek assistance from experts in the field.
Expert Assistance
Upgrading your PC’s graphics card is undoubtedly a valuable enhancement, but it can be a bit daunting if you’re not familiar with the internal components of your computer. If you ever find yourself unsure about any step or encounter unexpected issues during the process, seeking expert assistance is a smart move. Many PC enthusiasts and professionals are readily available to provide guidance and ensure a successful upgrade.
Regular Maintenance
Maintaining your PC doesn’t end with just the graphics card. As you continue your PC journey, it’s crucial to keep up with regular maintenance. This includes cleaning your PC from dust, updating all drivers, and making sure that your entire system is in tip-top shape. Neglecting regular maintenance can lead to performance issues and even hardware failures down the line.
Future Upgrades
Once you’ve successfully removed your old graphics card and installed a new one, you’ve taken a significant step toward improving your PC’s performance. However, don’t forget that a PC is a dynamic system, and there are always more upgrades and enhancements to consider. Whether it’s adding more RAM, upgrading your CPU, or increasing your storage capacity with a faster SSD, these are all potential upgrades that can further elevate your computing experience.
Preparation and Safety
Before diving into the removal process, it’s essential to gather the necessary tools and take safety precautions. Ensure you have an anti-static wrist strap, a screwdriver, and a well-lit workspace. Additionally, disconnect all power sources and peripherals from your PC.
Uninstalling Drivers
To avoid any conflicts with your new graphics card, start by uninstalling the drivers for your current GPU. This can be done through the Device Manager or by using driver removal software.
Power Down Your PC
Turn off your PC and unplug it from the power source. Safety should always be a top priority when working on any internal components of your computer.
Opening the PC Case
Carefully open your PC case by removing the screws or latches securing it. Once the case is open, you can access the internal components.
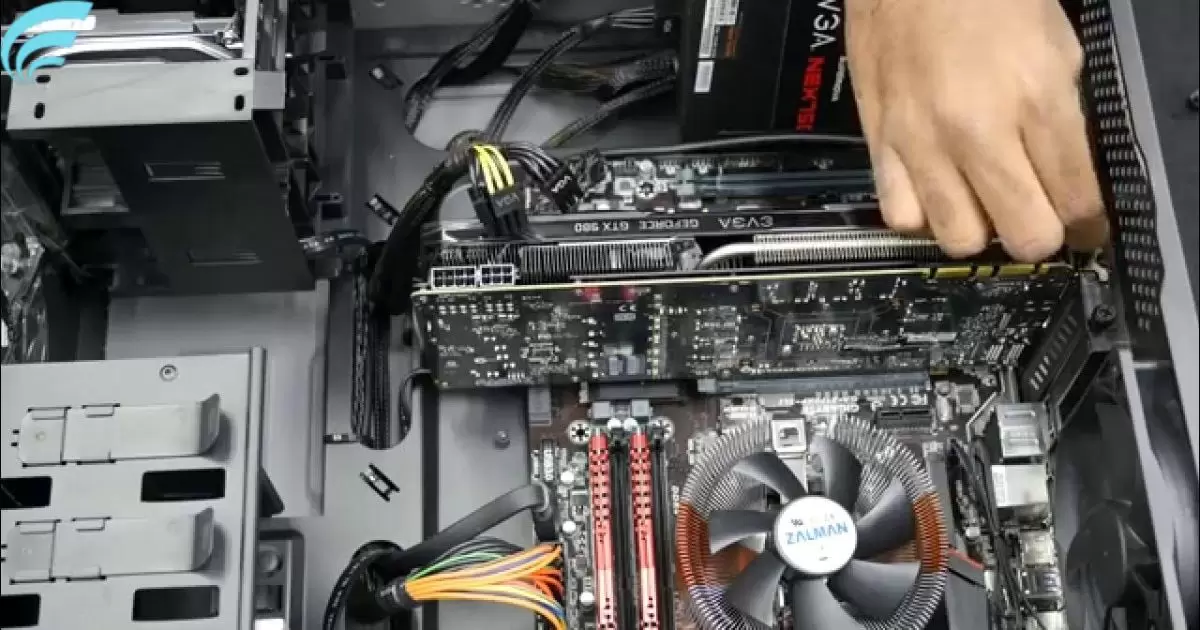
Locating the Graphics Card
Inside your PC, locate the graphics card. It’s typically positioned in a PCIe slot on the motherboard and connected to the power supply.
Removing the PCIe Connector
Gently press the release latch on the PCIe connector and disconnect it from the graphics card. This releases the card from the motherboard.
Releasing the Graphics Card Bracket
Most graphics cards are secured to the case with a bracket or latch. Unscrew or release any securing mechanisms to free the card.
Gently Extracting the Card
With the PCIe connector and bracket released, carefully slide the graphics card out of its slot. Avoid using excessive force to prevent damage.
Final Safety Checks
Before proceeding, double-check that no cables or connectors are still attached to the graphics card. Ensure it’s entirely free before removal.
FAQs
Can I use the same drivers for my new graphics card?
No, you should install drivers specific to your new graphics card.
What should I do with my old graphics card?
You can sell, recycle, or repurpose it in another system.
Do I need to update my BIOS when changing the graphics card?
It’s not always necessary, but it’s a good practice to ensure compatibility.
How often should I clean my PC?
Regular cleaning, at least every few months, helps maintain optimal performance.
Can I remove a laptop’s graphics card?
Most laptops have integrated graphics, making it impossible to remove or upgrade the GPU.
Conclusion
In conclusion, understanding how to remove graphics cards from a PC is a crucial skill for anyone looking to maintain or upgrade their computer. This process empowers you to make necessary hardware changes, enhancing your PC’s performance and keeping it up-to-date with the ever-evolving demands of modern computing. As you’ve learned, taking precautions, such as powering down the PC and uninstalling drivers, ensures a safe and smooth removal process.
By mastering the art of graphics card removal, you pave the way for potential upgrades that can transform your PC into a powerful and versatile machine. Whether you’re a gaming enthusiast or a professional seeking top-notch performance, knowing how to remove a graphics card is a vital step toward achieving your computing goals.
So, armed with this knowledge, you’re ready to explore the world of PC upgrades and maintenance confidently. Don’t hesitate to embark on your journey to an improved computing experience and make the most of your PC’s capabilities. Happy computing.