Taking a graphics card out of your computer is a straightforward process. First, power down your PC and disconnect all cables from the card. Then, unscrew any fasteners securing it in place and gently lift the card out of its slot. Be cautious not to damage any components during this operation. This procedure is essential for upgrading or maintaining your GPU.
Ready to supercharge your computer performance or troubleshoot graphics issues? Discover the secrets of upgrading or removing your GPU in our comprehensive guide on How to Take a Graphics Card Out. Don’t miss out; let’s dive in and empower your PC today.
Removing a graphics card may seem daunting, but it’s a vital skill for PC enthusiasts and troubleshooters. Our step-by-step guide on How to Take Graphics Cards Out provides clear instructions, ensuring a smooth and risk-free process. Whether you’re upgrading your GPU or addressing hardware issues, this knowledge is essential. Say goodbye to tech jitters and hello to enhanced computer performance with our easy-to-follow instructions.
Tools and Preparations
- Safety First: Always ensure your computer is powered off and unplugged from the electrical outlet.
- Antistatic Wrist Strap: For added safety, wear an antistatic wrist strap to prevent electrostatic discharge.
- Screwdriver: Depending on your PC case, you may need a Phillips or Torx screwdriver.
Steps to Remove a Graphics Card
Open the Computer Case
When it comes to upgrading or maintaining your computer’s hardware, one of the first steps is opening the computer case. This simple yet crucial action grants you access to the internal components, including the graphics card. Depending on your computer case’s design, the method for opening it may vary. In the following paragraphs, we’ll explore the importance of this initial step and how to perform it safely.
Easy Access to Your PC’s Heart
Your computer’s case is like its protective shell, guarding the valuable components inside. When you open the case, you gain direct access to your PC’s heart, allowing you to make necessary changes or troubleshoot issues efficiently. This step is the gateway to hardware improvements, making it an essential starting point for any DIY enthusiast.
isconnect Power
Before delving into the process of removing your graphics card, it’s crucial to prioritize safety. Start by disconnecting all power cables attached to your GPU. This step ensures that no electrical connections are active and eliminates any risk of electric shock during the removal process.
Uninstall Drivers
Uninstalling drivers is a crucial step when taking out a graphics card. It ensures a clean removal process, preventing any software conflicts when you install a new card or troubleshoot issues. Be sure to follow the manufacturer’s guidelines or use dedicated software to uninstall the graphics card drivers from your operating system.
When dealing with the best graphics card for Blender, maintaining a pristine driver environment is especially vital to harnessing the full power of your hardware for rendering and 3D modeling tasks.
Remove PCIe Bracket Screw(s)
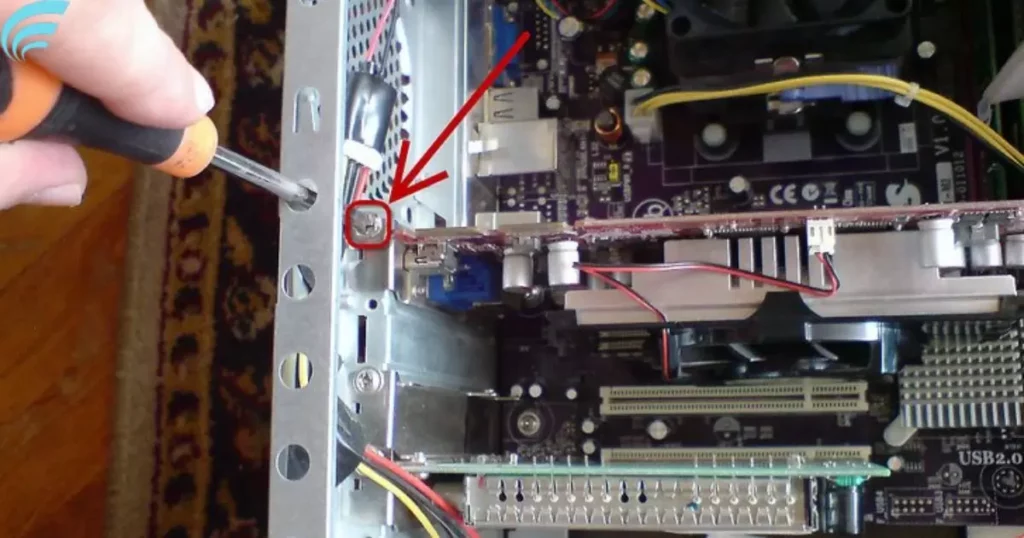
Graphics cards are secured to the case with screws at the rear PCIe bracket. Depending on your case, there may be one or more screws holding the card in place. Remove these screws using your screwdriver.
Unclip PCIe Retention Clip
Most motherboards feature a PCIe retention clip that secures the graphics card. Gently push down or aside on this clip to release the card.
Carefully Remove the Card
With the PCIe bracket screws removed and the retention clip unclipped, gently hold the graphics card by the sides and pull it upward. Be cautious not to force it, as PCIe connectors can be snug. If your card requires additional power connectors, detach them as you remove the card.
Store Safely
After removing your graphics card, it’s important to store it securely, especially if you plan to reuse it or keep it as a spare. The best practice is to place the card in an antistatic bag, which safeguards it from static electricity. Once in the bag, store it in a dry and secure location, protecting it from dust and moisture.
Here’s a suitable table:
| Storage Tips |
|---|
| 1. Use an antistatic bag |
| 2. Store in a dry place |
| 3. Protect from dust and moisture |
| 4. Label the card for easy identification |
FAQs
Do I need to uninstall the graphics card drivers before their removal?
It’s good practice to uninstall the drivers for a clean removal. This ensures there are no software conflicts when you install a new card.
Can I reuse the same graphics card after removal?
Yes, you can reinstall the same card or use it on another compatible system.
Are there any precautions to take with electrostatic discharge during removal?
To prevent electrostatic discharge, wear an antistatic wrist strap and work on a static-free surface.
How do I know if my power connectors are disconnected from the card?
Power connectors are typically located at the top of the graphics card. Ensure they are detached before pulling the card out.
What’s the best way to store a removed graphics card?
Place it in an antistatic bag and store it in a dry, safe place to protect it from dust and moisture.
Conclusion
In conclusion, mastering the art of how to take graphics cards out is an invaluable skill for anyone seeking to optimize their computer’s performance or troubleshoot graphics-related issues. By following our step-by-step guide, you’ve gained the knowledge and confidence to navigate this process smoothly and safely. Whether it’s for upgrading your GPU, performing routine maintenance, or addressing technical concerns, this expertise empowers you to take control of your PC.
So, don’t hesitate to embark on your hardware journey. With the right precautions and a clear understanding of the process, you can enhance your computer’s capabilities or resolve any graphics card-related challenges. Now, go ahead and put your newfound skills to work and enjoy a smoother and more efficient computing experience.